
In this guitar lesson we’ll be taking a look at octave displacement, which is a useful compositional technique that allows you to easily create many variations of a melody. But, before we look at this technique, we should briefly talk a little bit about octaves…
Understanding Octaves
An octave is a musical interval (i.e. distance) that’s formed by two notes that are exactly twelve half-steps apart in pitch. To give you one example of an octave, please do the following…
- Play the open A-string on your guitar.
- Play the twelfth fret of your A-string.
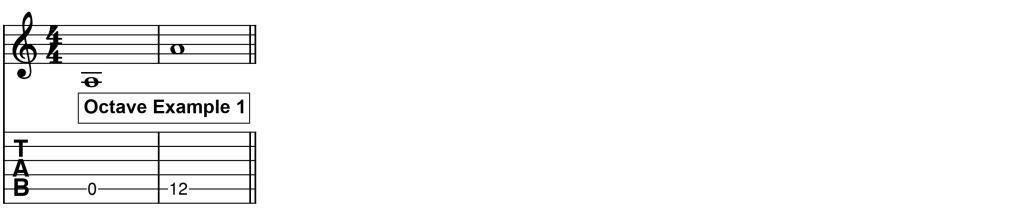
The interval that’s created by playing these two notes is called an octave. (Side note: Octaves are often called perfect octaves, but I’ll stick to the less wordy “octave” for this lesson).
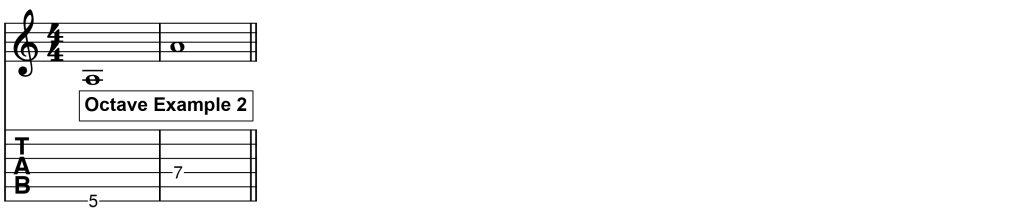
Of course, this isn’t the only way to play an octave—I just started with this example so that the distance between the two notes is very easy to see. Let’s now look at a more sensible way of playing the exact same octave. Please play the following two notes on your guitar…
- The fifth fret on your thick E-string.
- The seventh fret on your D-string.
Now that we’ve touched on what octaves are, let’s now look at a couple of exercises that use octaves…
Two Exercises That Use Octaves
Before we start looking at octave displacement, it’s important to spend some time practising octaves. This is important for a couple of reasons…
- It helps you get better at visualising octaves on guitar. Simply put, if you can’t see octaves clearly on the fretboard, then using octave displacement as a compositional tool will be painfully slow.
- It gets you used to playing large intervals. Musical ideas that make use of octave displacement can use very wide intervals, which often involve some very awkward movements for both the fretting and picking hands. So it’s a great idea to get used to these awkward movements before tacking octave displacement.
OK, let’s jump right in with the first exercise…
Octave Exercise 1
This first exercise uses notes from the A natural minor scale. I’ve included some fingering suggestions underneath the TAB, just in case you’re wondering what fingers I use when playing the exercise…
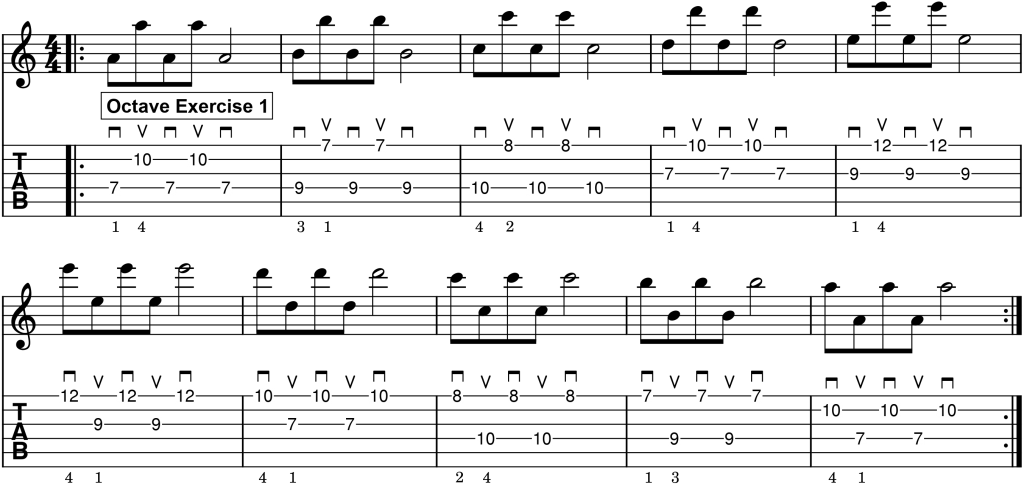
Here’s the exercise played at 120 BPM…
Now let’s hear the exercise played at 60 BPM…
Octave Exercise 2
This second exercise is a more advanced version of the previous exercise. You’ll notice that you have to move through the octaves much more rapidly than with the first exercise!
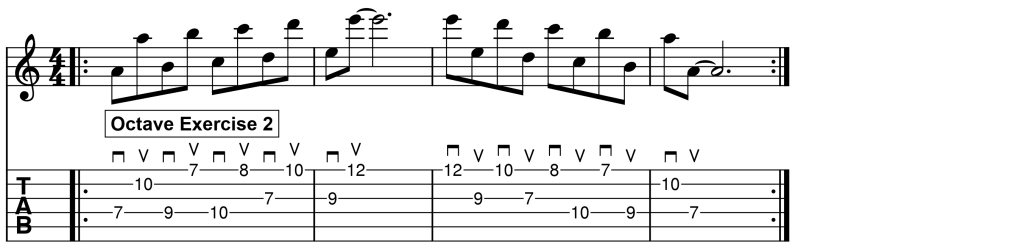
Let’s now listen to the exercise played at 120 BPM…
And here it is being played at 60 BPM…
Once you’ve spent some time practising the exercises above, then you’re ready to get started with octave displacement…
What Is Octave Displacement?
I define octave displacement as the process of moving (i.e. displacing) one or more notes of a melody to a different octave.
Like many definitions, it’s much easier to understand octave displacement if we look at a specific example. So let’s take a look at a melody that we can apply octave displacement to…
An Example Melody For You To Learn
Below is a super-simple two bar melody that I composed using the A natural minor scale. Although I’ve written my picking preferences above the TAB, feel free to play the melody in any way that you want—the notes of the melody are what’s important, not the specific method of articulation used to play those notes. 🙂

Here’s the melody being played at 100 BPM…
Please take some time to listen to and memorise the melody now. Once you’ve done that, then you’re ready for the next step…
Creating Melodic Variations Using Octave Displacement
For the first melodic variation, we’ll be taking the first note of the melody and move it one octave higher…
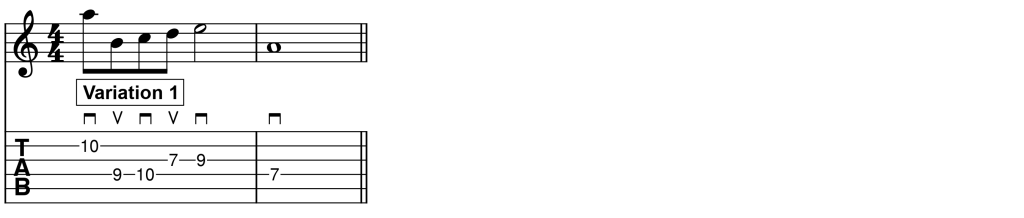
Here’s this variation being played at 100 BPM…
By displacing the first note up an octave, this has introduced a wider interval between the first two notes of the melody. It also means that the first note of the melody now descends in pitch to the second note.
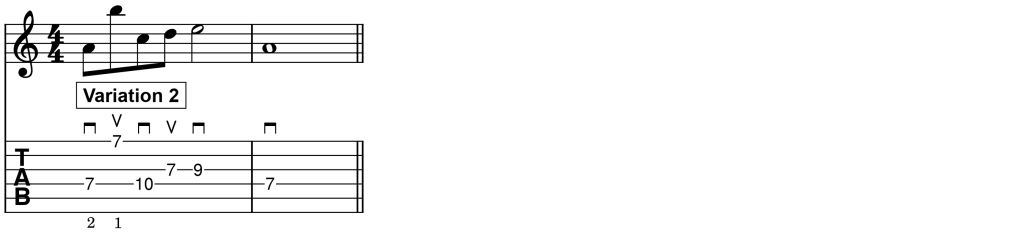
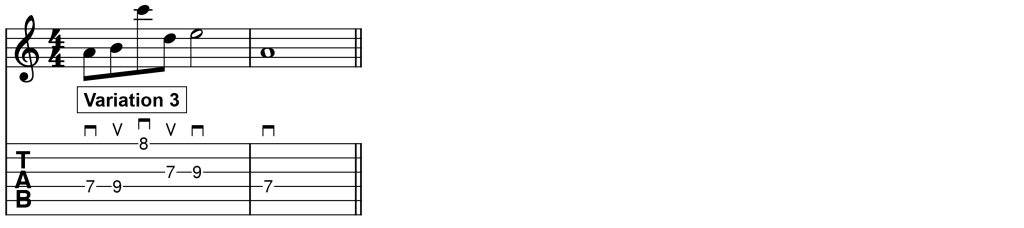
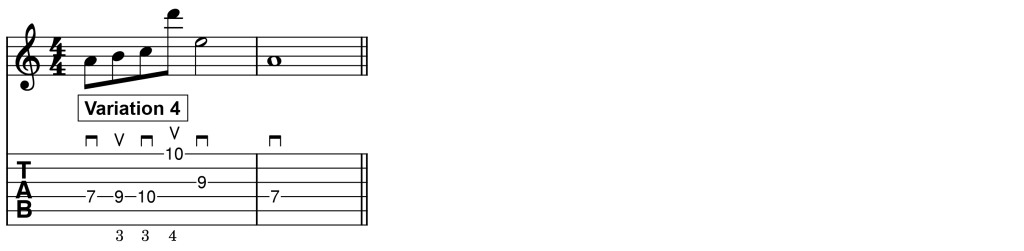
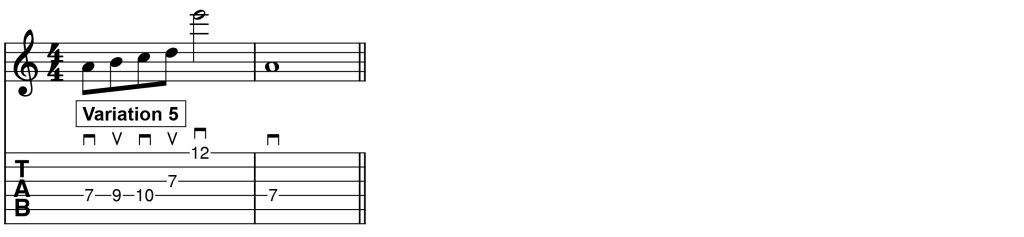
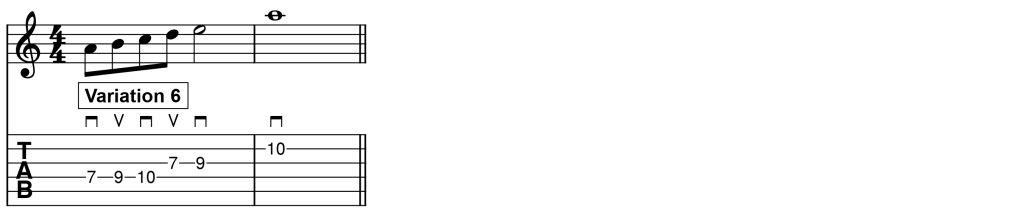
Let’s Work Out The Rest Of The Variations
Now that we’ve applied octave displacement to the first note, what we’re going to do now is repeat the process for the remaining notes of the melody. Let’s take a look at all the variations now…
A Few Important Points
Now that you’ve had a chance to listen to and play the variations, here are a few important things that I need to mention…
- Not all variations you create using octave displacement will sound good. In my opinion, some of the variations above sounded pretty weird and clunky. But that’s OK—the goal is to experiment until you come up with something that sounds good to you.
- This is a mechanical approach to creating variations. The approach we used in this lesson was very mechanical and required absolutely no creativity. But, as you gain experience with octave displacement, you’ll be able to start to hear melodies that use it. So there will be less trial and error needed.
- We’ve only scratched the surface. All the variations we created for this lesson only changed one note of the melody by moving it up an octave. But, if we wanted to change multiple notes at once, we could also do that. We could also experiment with moving notes down an octave. Or how about moving some notes up and some notes down? You get the idea—there are many more variations that we could have created from the original melody.
A Few Last Words
That’s all for this lesson, I hope you enjoyed this introduction into the crazy world of octave displacement! Be sure to take a few melodies you know and apply octave displacement to it—I’m sure you’ll come up with some interesting sounding variations. 🙂
Have fun!
Are You An Auckland Guitarist That Wants To Significantly Improve Your Electric Guitar Playing?
 If you're an Auckland guitarist wanting to improve your guitar playing, then my Auckland electric guitar lessons might be for you. I can help you to the develop technique, musicianship and mindset that will move you closer to how you truly want to play.
To find out more about exactly how I can help you improve your playing, then download my latest Auckland guitar lessons info pack below...